Some of the formulas used to find values can be confusing. For more in-depth descriptions of where these formulas come from, read the tutorial on encasing objects within an elliptical boundary without using Point and Dimension objects. This tutorial is slightly different than this one in that there are more variables. Read the Notes section at the bottom of the other tutorial to learn which variables correspond to each other between the two tutorials.
This process can be done using both for and while loops, but the loop constructions will be very similar for both kinds of loops so I will only go over the construction and usage of a for loop.
Before you being coding, you will need to know the center point of the boundary ellipse, the width and height of the boundary ellipse, the length of the horizontal axis (half of the width of the boundary ellipse), the length of the vertical axis (half the height of the boundary ellipse), the size you want your fill objects to be, and how much size noise you want to add if you are adding size noise.
Your first two lines of code need to be import java.awt.Point and java.awt.Dimension or else you won't be able to use Point and Dimension objects (lines 1-2).
You will need to instantiate variables representing the center point of your boundary ellipse, the Point boundaryCenter here (line 8); the width and height of your boundary ellipse, the Dimension boundarySize here (line 9); the lengths of the horizontal and vertical axes, the Dimension axisSize here (line 10); the center point of the fill objects, the Point fillCenter here (line 11), which will be assigned a random value within the loop body; the width and height of the fill objects, the Dimension fillSize here (line 12); the y value of a point on the bottom edge of the boundary ellipse at a given x value, the float yEdge here (line 13), which will be assigned a value within the loop body; and the size noise, called noise here (line 13).
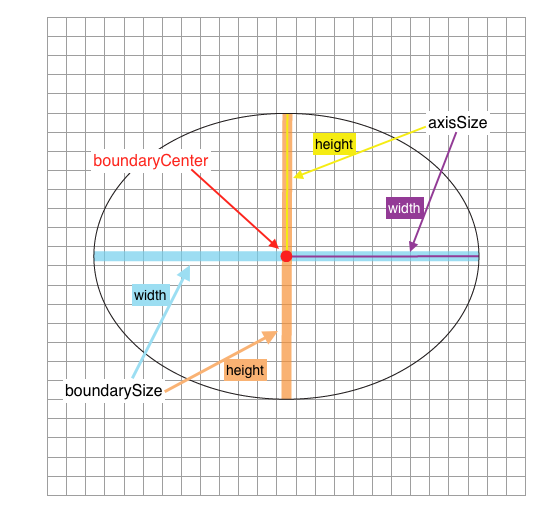
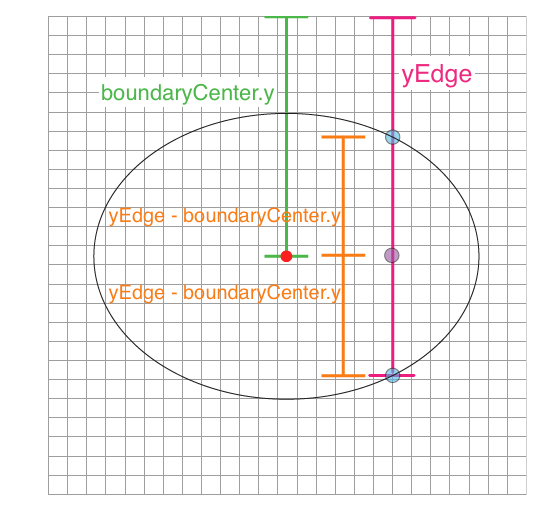
The visual below shows which parts of the boundary ellipse are referred to by the variables boundaryCenter, boundarySize, and axisSize.
To make the result more clear, I will draw the boundary ellipse before the loop (line 17).
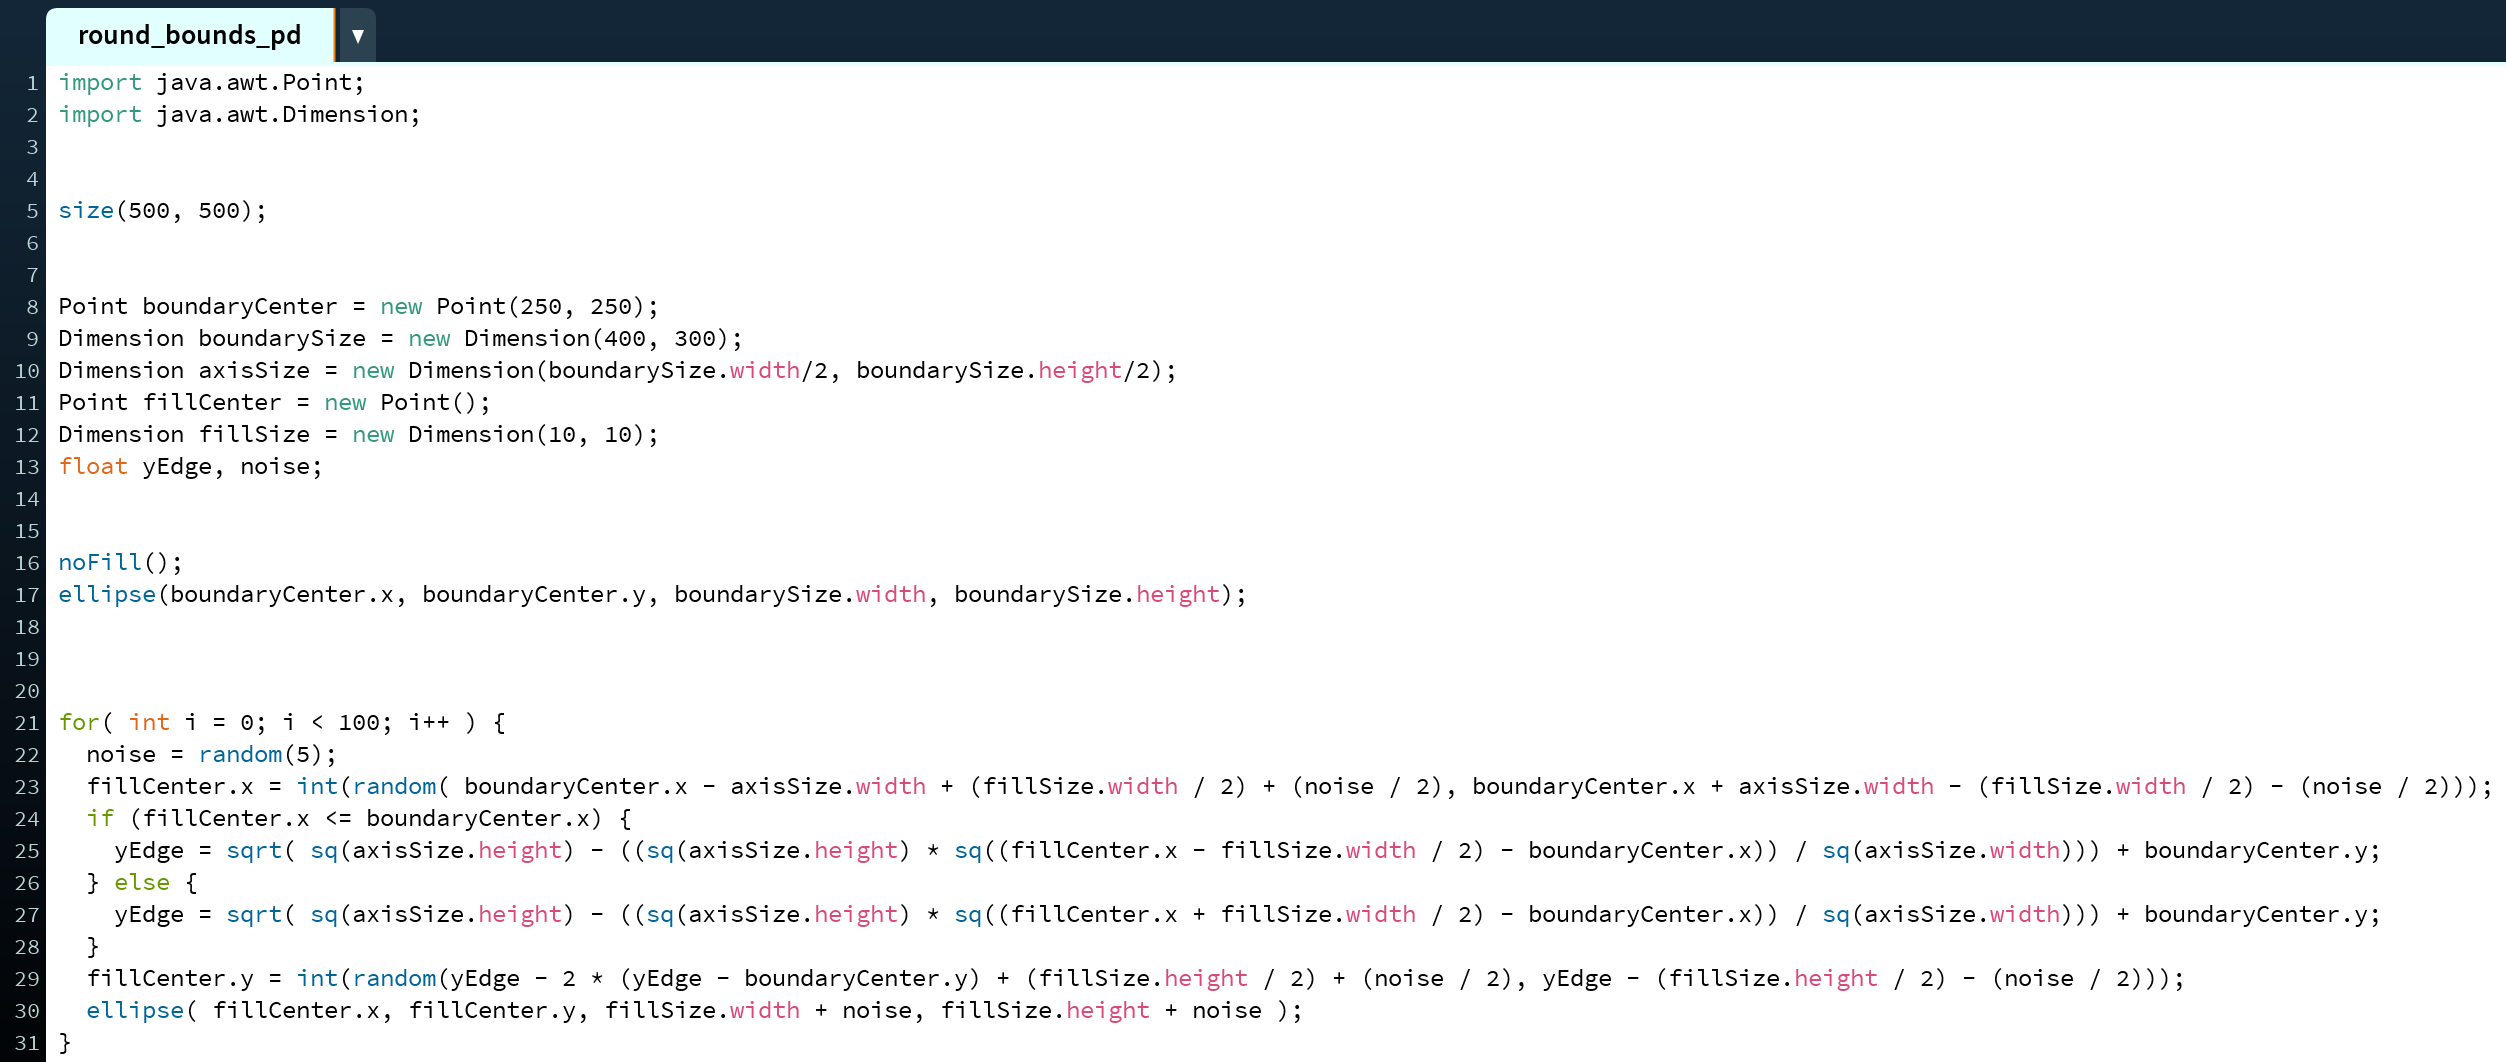
Set up the for loop to iterate the same number of times as objects you want enclosed in the boudary, as each loop itaration will draw one object. In this example, we want the program to draw 100 small ellipses within a larger ellipse, so the loop is set to run 100 times (line 21).
It's important to put the following lines into the loop in the correct order because each variable assignment relies on the variables assigned before it.
First, assign a random value to your noise using a maximum number of your choosing. In this example, we'll have a max value of 5 (line 22).
The next thing you need to do in your loop body is find the x value of the center of your fill object, which is called fillCenter.x in this example.

We only want x values that fall within the elliptical boundary, so we want the random function call to select a number between the x values of points A and B.This can be done easily by subtracting the horizontal axis length, axisSize.width, from the boundaryCenter's x value to get all values between C and A, and by adding the horizontal axis length to the boundaryCenter's x value to get all values between C and B. However, if we leave the formulas at this, then only the center of the fill object will be constrainged to these x boundaries. In order to constrain the entire object, we will need to take into account its size.
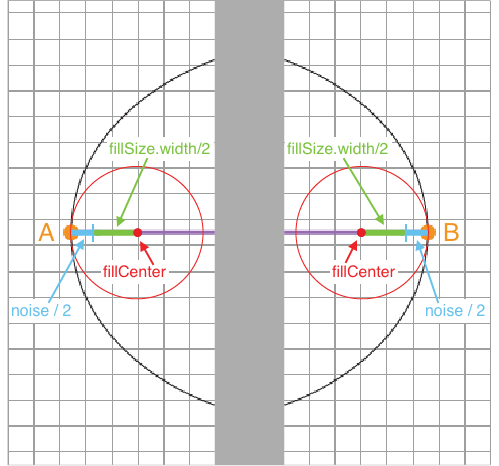
To do this, we will need to add to our left bound half of the fillSize.width and half of the noise. We will also need to subtract from the right bound half of the fillSize.width and half of the noise.
Bringing this all together, we come up with a random value that will have a minimum (or left bound) of boundaryCenter.x - axisSize.width + (fillSize.width / 2) + (noise / 2) and a maximum, or right bound, of boundaryCenter.x + axisSize.width - (fillSize.width / 2) - (noise / 2) .
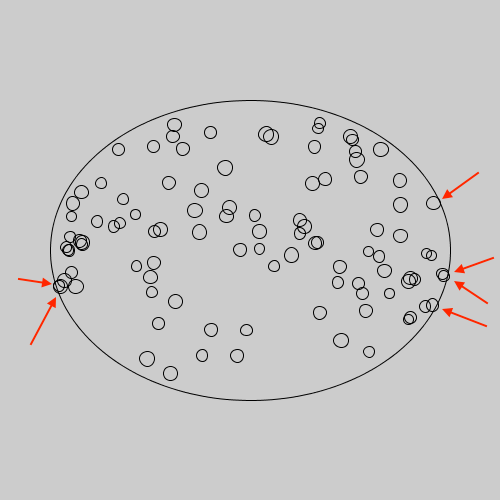
Next, we will need to find the y value of the point on the bottom edge of the boundary ellipse that we will later use to constrain fillCenter.y, the y value of the center of our fill object. We will use the if/else statement to ensure that we can find the proper yEdge value on either side of the boundayCenter.x because we will be basing our yEdge values on the x value of the edge of the fill object that's closest to the edge of the boundary object. It is necessary that we do this because if we dont and calculate yEdge based on fillCenter.x then occassionally some of the fill objects will extend past the edge of the boundary ellipse, like this:
Fill objects to the left of boundaryCenter will need to have their yEdge value calculated based on their left-most point (fillCenter.x - (fillSize.width / 2) - (noise / 2)) and fill objects to the right of boundaryCenter will need to have their yEdge value calculated based on their right-most point (fillCenter.x + (fillSize.width / 2) + (noise / 2)). Because of this, the calculation for yEdge will be slightly different depending on where fillCenter.x is.

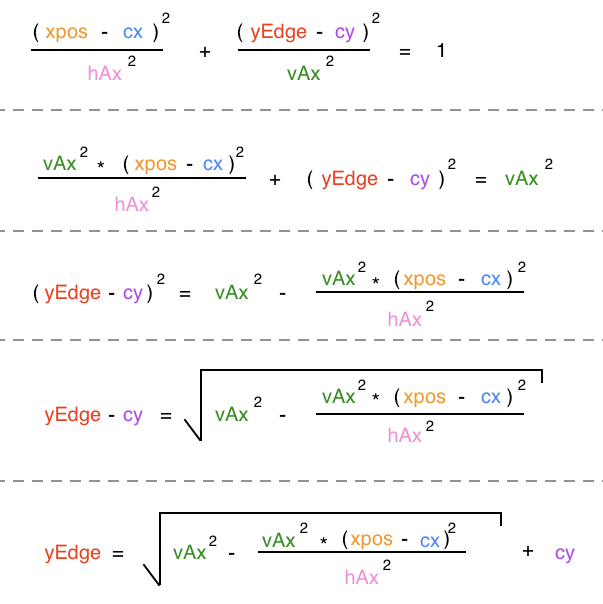
You will notice that the equations in the code above for finding yEdge are almost identical expect for the portion that uses fillCenter.x, which varies slightly based on the above given reason. I will go over where the equation for yEdge comes from, but I will simply use "xpos" in place of "fillCenter.x - (fillSize.width / 2)" and fillCenter.x + (fillSize.width / 2)."
The general equation for an ellipse looks like this:
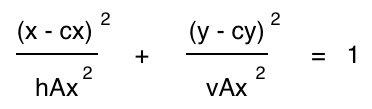
where x is the x value of a point on the edge of the ellipse, y is the y value of a point on the edge of the ellipse at position x, cx is the x value of the center of the ellipse, cy is the y value of the center of the ellipse, hAx is the horizontal axis length, and vAx is the vertical axis length. In our code, we already have values for all of these variables except y, wich is the yEdge value we're trying to find: x is fillCenter.x, cx is boundaryCenter.x, cy is boundaryCenter.y, hAx is axisSize.width, and vAx is axisSize.height. This means that we need to solve this equation for y to find our yEdge value. There are several ways to do this, but below is the way I solved it.
In our Processing code, this equation looks like this:
![]()
Now we just need to put the different x values we will be using in place of fillCenter.x into the equation in the if/else statement(lines 24-28).
Now that we have defined our yEdge value, we will need to define our fillCenter.y value. This will be a randomly selected number based on bounds we will define using our yEdge value.

Using the above diagram, you can see that boundaryCenter.y is the distance between the top of the canvas and boundaryCenter and that yEdge is the distance between the top of the canvas and a point on the bottom edge of the boundary ellipse. We can use this information to determine that the distance between the point (fillCenter.x + fillSize.width/2 + noise / 2, boundaryCenter.y) and the bottom edge of the ellipse directly below can be found by subtracting boundaryCenter.y from yEdge. This means that we can find the minimum value that fillCenter.y can be–at the top edge of the boundary ellipse–by subtracting 2 * (yEdge - boundaryCenter.y) from yEdge.
However, we again need to ensure the entire object and not jus the center is contained within this boundary, so we need to include the distance between the center of our fill object and it's top edge into this equation. Doing this gives us the formula yEdge - 2 * (yEdge - boundaryCenter.y) + (fillSize.height / 2) + (noise / 2) for the minimum our fillCenter.y can be. Finding the maximum value fillCenter.y can be is much simpler. The largest value the edge of the fill object can be is yEdge. To constrain the entire fill object and not just the center to this boundary, weneed to subtract the distance between the edge of the fill object and the center of the fill object from the yEdge value. This gives us the formula yEdge - (fillSize.height / 2) - (noise / 2). These two formulas give us the bounds for our random assignment of fillCenter.y (line 29).
Lastly, you will need to draw the fill object (in this case an ellipse) using fillCenter, fillSize, and noise (line 30).
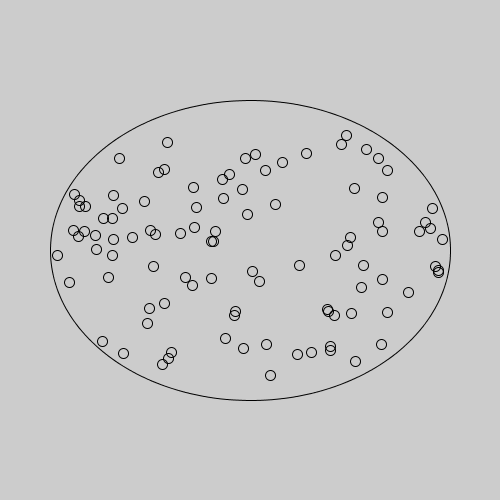
The end result will look something like this:

Encasing random objects within an elliptical boundary without using size noise on the fill objects is simpler than, but similar to, encasing random objects within an elliptical boundary using size noise. Essentially, the only difference is that any instance in which noise is used in the previous code should be deleted. Below is what the code looks like without these.

The end result will look something like this: