
This process can be done using a for loop or a while loop, but I will only go over the process for building this in a for loop because I find it simpler and the processes are almost identical.
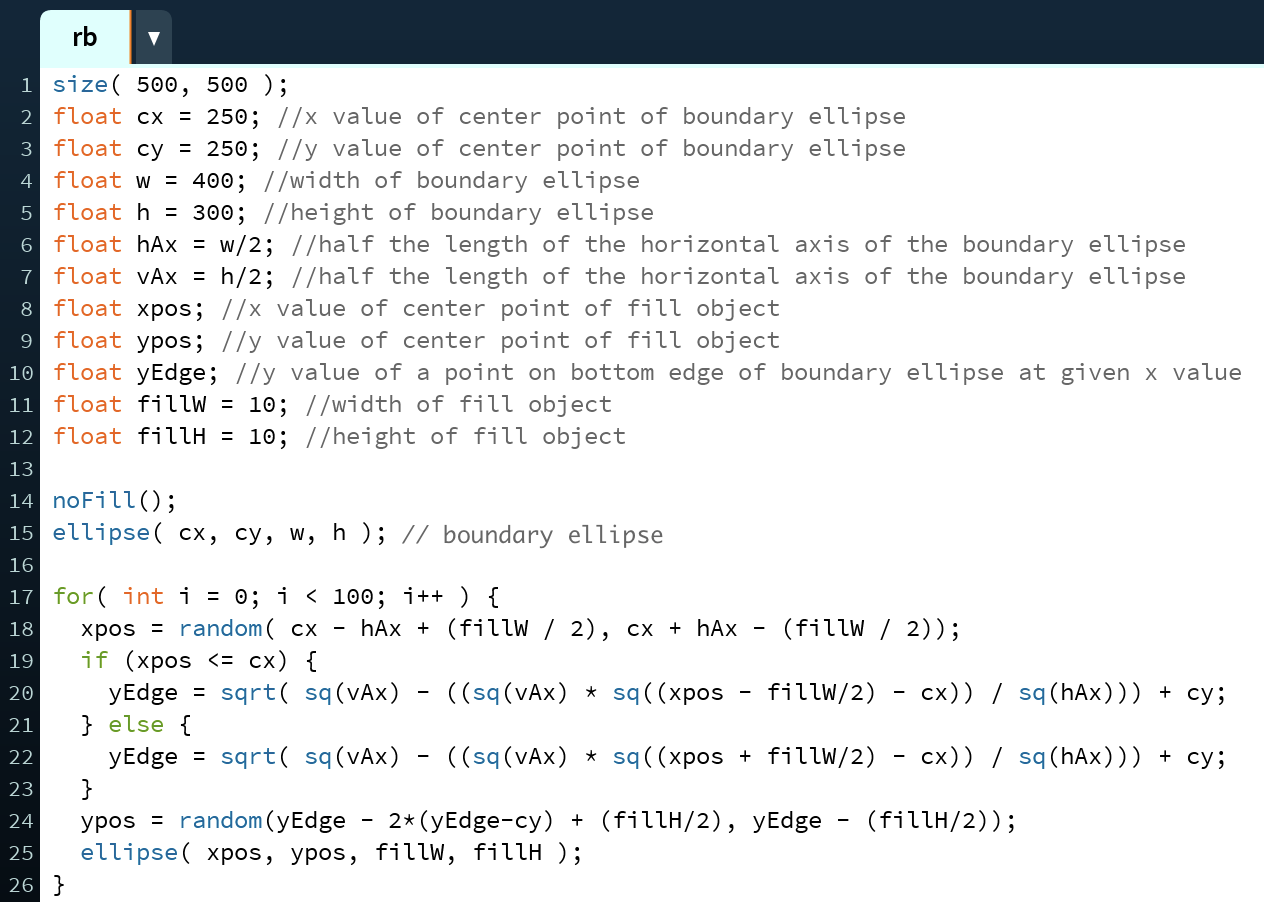
Before you begin, you must know the x and y values of the center of the encasing ellipse as well as its width and height. Additionally, you must also know the width and height of the object that you are using to randomly fill the ellipse and how many of these objects you want to have within the ellipse boundary. You will assign these values to variables in your code.
Before writing your loop, you need to set up your variables. You will have eleven variables in total if you aren't randomly altering the size of the filler objects using noise.These variables should be: the x value of the center of the boundary ellipse, called cx here (line 2); the y value of the center of the boundary ellipse, called cy here (line 3); the width of the boundary ellipse, called w here (line 4); the length of half of the horizontal axis of the boundary ellipse, which is equivalent to half of the width of the boundary ellipse, called hAx here (line 5); the height of the boundary ellipse, called h here (line 6); the length of half of the vertical axis of the boundary ellipse, which is equivalent to half of the height of the boundary ellipse, called vAx here (line 7); the x value of the center of the filling object, called xpos here (line 8), the value of which will be assigned randomly within the loop; the y value of the center of the filling object, called ypos here (line 9), the value of which will be assigned randomly within the loop; the y value of a point on the bottom edge of the boundary ellipse at a given x value, called yEdge here (line 10), the value of which will be assigned within the loop; the width of the filler object, called fillW here (line 11); and the height of the filler object, called fillH here (line 12). If you are using noise, you will need a twelf variablesfor the size noise, called noise here (line 13). The value of noise will be changed within the loop.
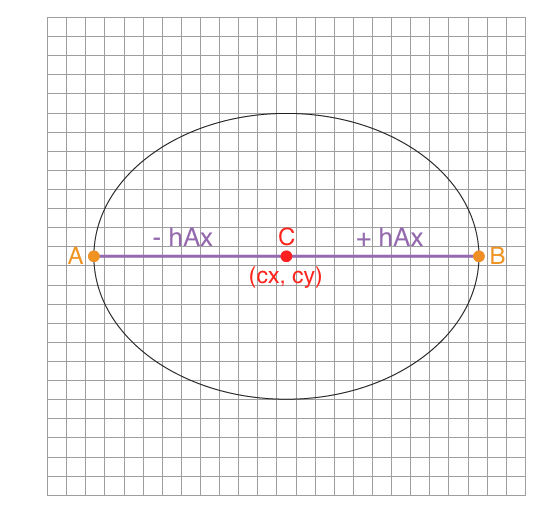
The visual below shows which parts of the boundary ellipse are referred to by the variables w, h, hAx, vAx, cx, and cy.
To make the end result more clear, I will draw the boundary ellipse before the start of the loop (line 16).
For an example on constructing this code without using size noise, scroll to the bottom of the page.
Set up the for loop to iterate the same number of times as objects you want enclosed in the boudary, as each loop iteration will draw one object. In this example, we want the program to draw 100 small ellipses within a larger ellipse, so the loop is set to run 100 times (line 18).
It's important to put the following lines into the loop in the correct order because each variable assignment relies on the variables assigned before it.
First, assign the noise a random value with a maximum possible value of your choosing, in this example we'll use 5 (line 19). This means that there will be a random value between 0 and 5, including 0 but excluding 5, added to fillW and fillH, which are the width and height of our fill shapes.
Next, you will need to assign a random value to xpos, the x position of the center of the fill object (line 20). To do this, we will need to construct equations to use as the bounds of the random function call.
We only want xpos values that fall within our large elliptical boundary, meaning we want to select a random number that will place our object between points A and B. By subtracting the horizontal axis length, hAx, from the x value of the center point of the boundary ellipse, cx, we know the minimum x value of the allowed range. Similarly, by adding hAx to cx we know the maximum x limit. However, if we stop here then only the center or top left corner of the fill object (depending on the shapeMode selected and the shape of the fill object) will be constrained to these x boundaries. In order to contrain the entire object, we will need to take into account its own size including its noise, in this case. To do this, we will need to add to our left bound half of the fill width, fillW, and half of the size noise.
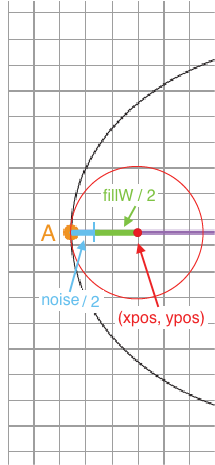
We similarly need to subtract from the right bound half of fillW and the size noise.
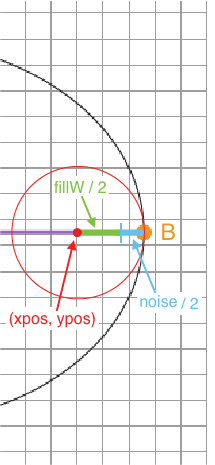
Bringing this all together, we come up with a random value that will have a minimum (or left bound) of cx - hAx + (fillW / 2) + (noise / 2) and a maximum, or right bound, of cx + hAx - (fillW / 2) - (noise / 2) .
This process will be slightly different if you are using non-elliptical fill objects, unless you have shapeMode set to CENTER because the dimensions extend from the starting point in a different way than when the starting point is in the center.
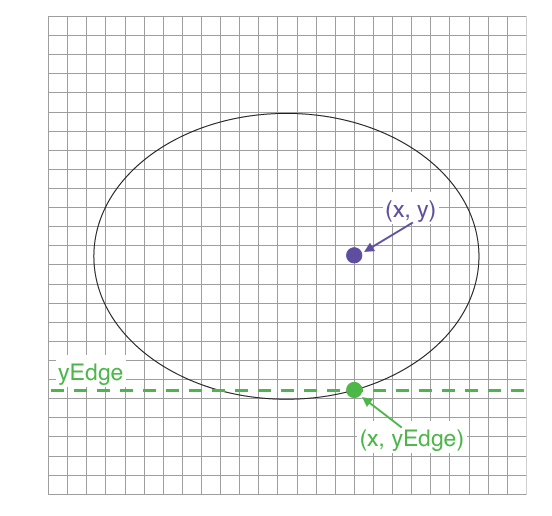
Next, we will need to find yEdge. This is the y value of a point on the bottom edge of the boundary ellipse at a given x value. We will use this value to constrain the y value of the center of the fill object, the variable ypos.
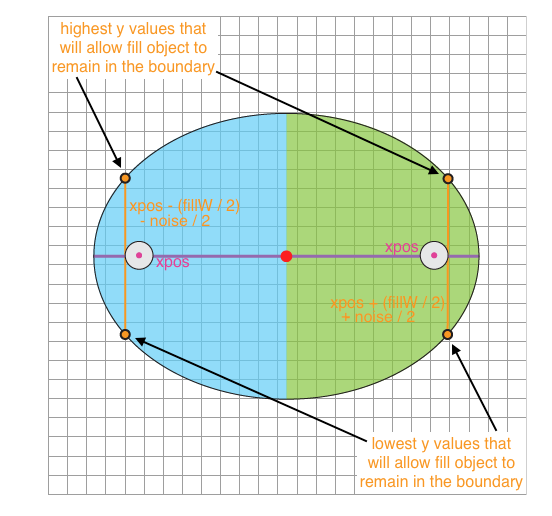
In doing this, we will first work to understand the purpose of the if/else statement. If we were to only constrain the ypos value based on the yEdge value at a given xpos, the x value of the venter of the fill object, then we are not considering the sides of the fill object, just the center of it. Because of this, it becomes possible for parts of the fill objects to extend past the edges of the boundary ellipse.
To account for this and make sure it doesn't happen, we need to constrain ypos by the smallest yEdge value that the fill object could come into contact with. When the xpos of the fill object is smaller than (to the left of) the x value of the center of the boundary ellipse, cx, we will need a different yEdge value that when its greater than (to the right of) cx. If xpos is less than cx then the smallest yEdge value that the fill object could come in contact with and remain within the boundary ellipse is the yEdge value at the left-most point of the fill object (xpos - (fillW / 2) - (noise / 2)). Similarly, if xpos is greater than cx then the smallest yEdge value that the fill object could come in contact with and remain within the boundary ellipse is the yEdge value at the right-most point of the fill object (xpos + (fillW / 2) + (noise / 2)).
Because of this, the calculation for yEdge will be slightly different depending of where the xpos is. You will notice that the equations for finding yEdge are almost identical except the part that uses xpos. Because we already went over the reasoning for this, I will go over where the equation for yEdge came from using simply "xpos" in place of "xpos - (fillW / 2) - (noise / 2)" or "xpos + (fillW / 2) + (noise / 2)."
The general equation for an ellipse is:

where (x, y) represents all points on the ellipse's perimeter. Thsi means that x is an x value of a point on the edge of the ellipse and y is the y value of the point at position x. Furthermore, cx is the x value of the center of the ellipse; cy is the y value of the center of the ellipse; hAx is the length of the horizontal axis, and vAx is the length of the vertical axis. In our code, we already have values for all of these variables except y, which is the yEdge value we are trying to find. This means that we need to solve the ellipse formula for y. There are several ways to do this, but below is the way I solved it.
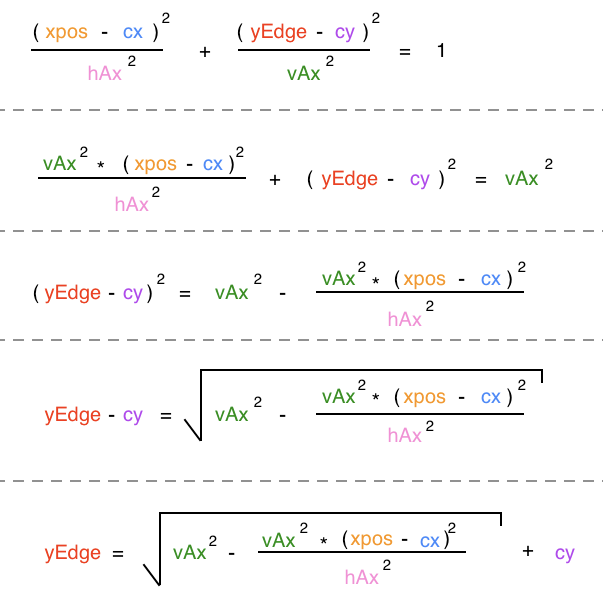
In Processing, this equation looks like this:
![]()
Now we just need to put the different formulas that we are using in place of xpos (xpos - (fillW/2) - (noise / 2) and xpos + (fillW / 2) + (noise / 2)) into the equation in the if/else statement (lines 21-25).
Now that we have defined our yEdge value, we will need to define our ypos value. This will be a randomly selected number based on bounds we will define using our yEdge value.
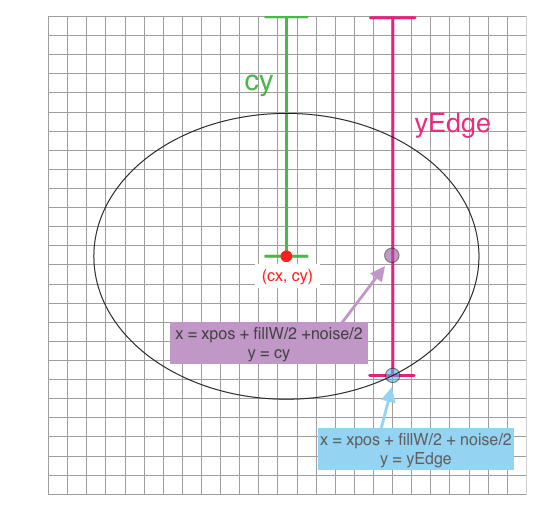
If you look at the above diagram, you will notice that cy is the distance between the top of the canvas and the center point of the boundary ellipse, and that yEdge is the distance between the top of the canvas and a point on the bottom edge of the boundary ellipse. Using this information, we can determine that the distance between the point at (xpos + fillW/2 +noise/2, cy) and the bottom of the ellipse at xpos can be found by subtracting cy from yEdge. This means that we can find the y value of the top edge of the ellipse at xpos by subtracting 2 * (yEdge - cy) from yEdge. Because the ellipse is horizontally symmetrical we know the distance between the middle and the top edge at a given x value is the same as the distance between the middle and the bottom edge at the same x value, so we can double the distance yEdge - cy to find the distance between yEdge and the top edge of the ellipse.

This gives us the equation yEdge - 2 * (yEdge - cy), however, we need to ensure the entire fill object, not just the center, is encased in this boundary, so we need to include the distance between the center of our fill object and its top edge into this formula. We end up with yEdge - 2 * (yEdge - cy) + (fillH / 2) + (noise /2) for the minimum our ypos can be. Finding the maximum value of ypos is much simpler. The largest y value the edge of the fill object can be is yEdge. To constrain the entire fill object, not just the center, to this boundary we need to subtract the distance between the edge of the fill object and the center of the fill object from the yEdge value. This gives us the formula yEdge - (fillH / 2) - (noise / 2). Using these two formulas, we have the bounds for our random assignmnet of ypos (line 26).
Lastly, you will need to draw the fill object (in this case an ellipse) using xpos, ypos, fillW, fillH, and noise (line 27).
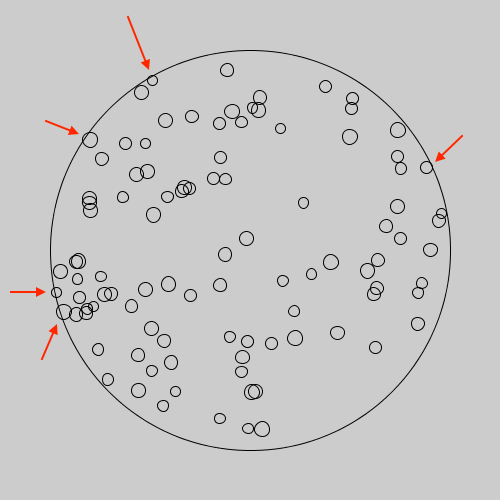
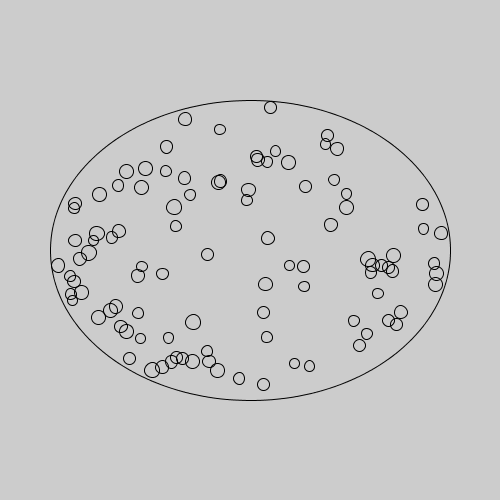
The end result will look something like this:
Encasing random objects within an elliptical boundary without using size noise on the fill objects is simpler than, but similar to encasing random objects within an elliptical boundary using size noise. Essentially, the only difference is that any instance in which noise is used in the previous code should be deleted. Below is what the code looks like without these.
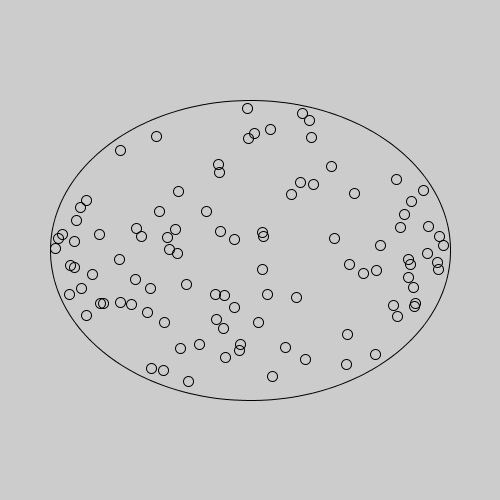
The end result will look something like this:
This section explains which variables refer to the same things between this tutorial and the tutorial on encasing random objects in an elliptical boundary using Point and Dimension objects.