You can make a tile pattern using an array to store the points of the corners of each diamond before drawing them. If you don't know what an array is, you can use my other tutorial which uses loops to create the pattern.
This tutorial will show you how to make the diamond pattern as shown in the image below, but you can modify it to draw square tiles if that's what you prefer.

Before you begin drawing tiles, you will need to know a few things about your sketch. The first thing is the coordinates of a few points. The first is the vanishing point of the tiled floor. If you have a sketch on paper, you find this point by extending the two sides of your trapezoidal floor area until they intersect. This intersection is called the vanishing point. As shown in the image below, we denote the vanishing point as V. The y-value of V is also the height of the horizon line, its y-value.

Another point on the horizon line is D. You can find the coordinates of D from a perspective tiled floor sketch by extending a diagonal line through the corners of your tiles to intersect the horizon (for the purposes of this tutorial, we are extending these lines toward the right side of the sketch). Note that D has the same y-value as H.

The last point you need to know is point A. Point A is the vertex at the bottom right of your floor.

You will also need to know two distances:
For this tutorial, we will be making our floor have a width of three tiles, so s is one third the length of our base.

Drag your mouse and use the arrow keys with the sketch below to see how each variable affects the floor.
After you have all this information, you are ready to begin making your tiles. Again, if you do not know how to use arrays, you should now go to the tutorial for creating tiles using loops.The first step is finding the coordinates of each point where a vertex of a tile will fall. These points will be stored in a two dimensional array. If h is the number of rows that your floor has, and w is the number of tiles in each row, then your array will be created using:
float[ ][ ] coordinates = new float[(h*w) + h][2]
The formula (h * w) + h represents the number of points that will need to be stored in your array, and 2 elements (one x-value and one y-value) will need to be stored for each of those points.
In order to fill this new array with points, you will need to find these points using parametric equations. The formula for a parametric equation given two points is:
x = x0 + t(x1 - x0)
y = y0 + t(y1 - y0)
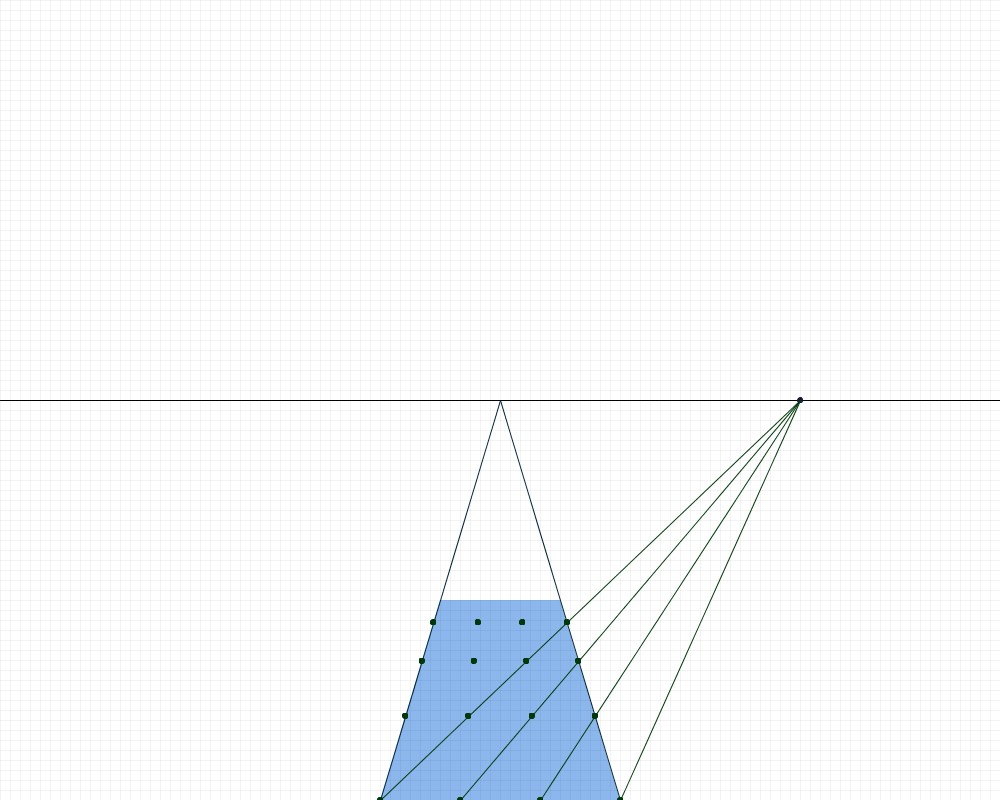
Along the base of your floor, you have h points which are each a distance of s apart, starting from A and heading in the negative direction. We will call these points Ak, where k is the number of tile lengths away from A the point is. There are now two lines we are interested in: VA and DAk. We need to solve the equation for the t-value where these two lines intersect. To find t, you will use the equation t = d / ((k * s) + d). Therefore:
x = xAk + (d / ((k * s) + d))(xV-d - xAk)
y = yAk + (d / ((k * s) + d))(yV-d - yAk)

We are going to create a loop to fill the array using this formula. I want my tile floor to be 5 tiles high and 3 tiles wide, so h is 5. This loop iterates once for each row of tiles. As you can see from the diagram below, this equation finds the points on the right side of our floor where each new row begins. The distance between the points gets shorter as the rows appear to get farther away.
for (int k = 0; k < h; k++) {
float t = d/ ((k * s) + d);
float x - Xd + (t * (Xa - k * s) - Xd));
float y = Yd + (t * (Ya - Yd));
ellipse(x, y, 5, 5);
line(Xa - (k * s), Ya, Xd, Yd);
}

However, the code above did not do anything to update our array. We need to add a nested loop in order to make sure that each of the points in each row is added to the array (make sure you have created an array before beginning this step). If xb is the point on the bottom left corner of our floor, and xq is the point on the left side of the floor across from our current x, then our loop should look like this:
for (int k = 0; k < h; k++) {
float t = d/ ((k * s) + d);
float x - Xd + (t * (Xa - k * s) - Xd));
float y = Yd + (t * (Ya - Yd));
ellipse(x, y, 5, 5);
line(Xa - (k * s), Ya, Xd, Yd);
for (int i = 0; i <= w; i++) {
float xq = (Xa - x) + Xb;
for (int j = 0; j <= w; j++) {
float xv = xq + (i * (x - xq)/w);
ellipse(xv, y, 5, 5);
coordinates[k * (w + 1) + i][0] = xv;
coordinates[k * (w + 1) + i][1] = y;
}
}
}

Note that you do not have to draw the points, they have only been included here so that we can visualize the coordinates that are being put into the array. After this step, your array should be full.
The final step to complete your tile pattern is to actually draw the tiles! Change your fill color and use noStroke( ) to turn off the stroke color. For a diamond pattern, we have to put the points in a order so that we actually end up drawing two triangles. Most of the time you have probably drawn quads this way on accident, but this will give us the pattern that we want. If you want square tiles, you will need to change the order of the points as well as changing the loop itself.
fill(...); //your fill color
noStroke();
for (int i = 0; i < h - 1; i++) {
for (int k = 0; k < w; k++) {
quad(coordinates[k + i + i * w][0], coordinates[k + i + i * w][1],
coordinates[(k + i + i * w) + 1][0], coordinates[(k + i + i * w) + 1][1],
coordinates[(k + i + 1) + (i + 1) * w][0], coordinates[(k + i + 1) + (i + 1) * w][1],
coordinates[(k + i + 2) + (i + 1) * w][0], coordinates[(k + i + 2) + (i + 1) * w][1]);
}
}

If something seems a little off (maybe the corners of the tiles don't touch the edge of the floor, or the tiles don't quite reach the top of the floor area), it is possible that you miscalculated D. You can go back and change your value for D to correct this, but make sure you are updating d accordingly (d = xd - xv).