|
CS 341
Project 2 |
Java2D
Direct Manipulation |
Your users have been introduced to the jinn in project 1 and have some ideas as to how they can bend them to their wishes. Now, your users have to find a bunch of jinn (they do not come in crate unfortunately) and set them to work doing whatever they wish. The standard way of finding them in their bottles is by catching them in a fishing net, or by finding the bottle as it is washed ashore. But neither seems to happen very often, not enough for industrial scale exploitation. We will assume, however, that many are washed ashore unfound, and remain buried under sand, just waiting to be discovered. Shifting large amounts of sand is necessary, and users don't want to do so by hand.
To help your user with this task, we will, in this project, create the interface to a digger. The interface consists of an image on the display, showing the digger, which the user operates using direct manipulation. You can, if you wish, imagine a real digger digging away on the beach as the user manipulates the screen digger. However, you will be pleased to hear that creating and controlling the real digger is not part of the project.
The interface is to be implemented in Java. The moving parts
of the digger will be controlled by changing their two-dimensional
transformation matrices using Java2D, which requires you to master
geometry using homogeneous coordinates and matrix transforms.
To help you get started, the royal
directory contains a short sample
program showing how shapes and transformations can be used in Java2D.
Description
The digger geometry
The digger you should implement is a two dimensional one containing features that you will find in backhoes and highhoes. It should resemble the illustration immediately below. It consists of- a base (A, B), which is rigid and can be translated around the display,
- an extendable arm (C), which is attached to the base by a pivot,
- a bent arm (D), which is attached to the extendable arm by a pivot, and
- a bucket (E), which is attached to the bent arm by a pivot.
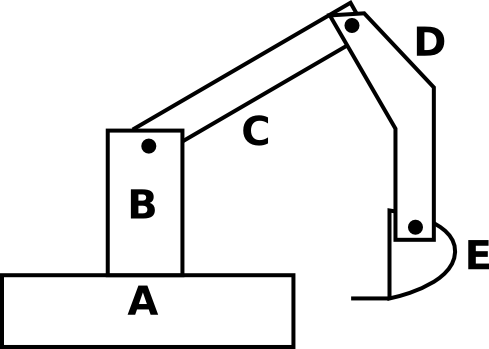
All parts shown in the above diagram must be present, the relative sizes being roughly as shown. Don't vary the relative sizes in ways that diminish the functionality of the digger. In particular, it is essential that the bucket should be able to reach the ground at the bottom of the base of the digger when the extendable arm (C) is at an angle slightly above horizontal.
The digger affordances
Listed below are the digger affordances that must be supported in your interface. The user input that invoke the digger affordances are your design.
Feel free to assume that the user has a three button mouse with or without a scroll wheel. The user can move the mouse anywhere in the window with any combination of the buttons pressed. You are to design an interface that maps user actions (mouse and keyboard) into commands for the digger.
The result is a collection of affordances that allow the user to operate the digger by direct manipulation of its presentation on the display. The affordances that you are required to implement are the following.
- Translation. The user should be able to translate the digger as a whole.
- Rotation of the pivots. The user should be able to
rotate the pivots that join the different parts of the arm.
The ranges of rotation of the different pivots should sufficiently
realistic. For example the ranges given in the table below
are appropriate.
Between     Minimum     Maximum              Zero at
B & C         45          105        B collinear with C
C & D          0           90        C collinear with D
D & E        -60           60        As shown in figure
- The length of arm C. The user should be able to make arm C longer and shorter. The maximum extension should be twice the length of the minimum extension. The minimum extension should be about the size shown in the figure.
- The orientation of the digger. The digger is shown in the figure ready to dig to its right. It can be reflected in a vertical line in order to make it able to dig on the left.
Playback
To allow you to show off what you are able to make the digger do your implementation must be equipped with a record/playback feature. When record is turned on every event affecting the digger is saved. The sequence of events is written to a file when recoding is turned off, or when the playback command is given. On the playback command the recorded events are played back to the digger, which responds to the set of events that were recorded.
This is a simple form of animation, one which is very common when showing interface prototypes in seminars or business meetings. It fails to capture the timing of the original animation, but maintains the order precisely.
A simple implementation of record and playback is given in the
sample program, Digger.java which you can find in the
royal directory.
When your implementation is complete you must create an events file using the record feature. This file should show a full range of what your digger can do. It will be played as part of the marking process.
You should consider this to be a demo of your implementation. Review
your demo using playback to see how it will look. You will probably
want to make a few recordings and then choose the best one. Because
the sample program uses the magic filename events, make
sure you are not overwriting a demo file you want to keep.
Possible Enhancements
As with the other project you are expected to show some imagination and creativity, going beyond the above requirements. Enhancements include improving the digger appearance or its interface (possibly visualization during the playback capability). Here are a few ideas.
- Make the digger look more like a digger, probably by using more interesting shapes than simple rectangles. Do not interfere any of the digging affordances, or make them hard to use.
- Make the digger able to move sand from place to place. Moving sand requires you to create an environment for the digger containing movable sand, as described below (The Digger's Environment section).
- Put bottles into the sand the digger moves, so that a very skilled operator can extract the bottles from the sand. You might even allow a released jinnee to reward overly clumsy digger operators.
- Identify movement combinations that are common in digging, like rotating the bucket pivot while moving the bent arm. Then add to the interface affordances that make it possible for the user to invoke different movement combinations with a single mouse gesture.
- Enhance the playback capability with automatic annotation which provides a visualization of user actions as the digger is manipulated.
There are many other possible ideas. If in doubt whether or not an idea of yours is worth trying, please discuss it with the instructor.
The Digger's Environment
The digger can be placed anywhere in the window. You might wish to place in the window sand that can be dug by the digger. How does digging occur? The bucket has an open side, indicated by the horizontal ledge. The digger digs by pushing the bucket into the sand to be dug, open side first. It then rotates the full bucket to that the open side is up, and lifts the bucket out of the sand.
To dump the dug sand in a new location the digger moves the bucket above that location, then rotates the bucket until the open side is down. The sand in the bucket then falls out.
Successful movement of sand from one place to another is not part of the requirement. It would make a good enhancement.
Marking
Your project will be marked using the following sequence of steps.
- Your program will be using
javac Digger.java - Your program will be executed using
java Digger - Your playback will be observed.
- Your Readme file will be read.
- The program will be exercised.
- The code will be inspected.
An implementation of the functionality described in the Description section will be worth about 90% of the mark. To achieve all these marks it is necessary that you choose good interaction techniques and that they be well-implemented.
The remaining marks are based on implementation you do beyond the requirements, as described in the Possible Enhancements section.
You should hand in on royal/submit/proj2
a folder named with your team name
- your
Digger.javafile, - all other needed
.javafiles, - your playback file, called
demo, and - a
Readmefile.
Readme file should include
- the mapping between your anonymous team name and your student's identity
- a description of how the user accesses each of the digger's affordances and
- a list of not fully implemented requirements if any, with a description of the requirements done and indications of of any commented code to be considered for partial credit.
royal/public/digger). Thanks!