Advanced API topics
This section introduces two additional, and slightly advanced topics related to Switchyard APIs: creating new packet header types and using Switchyard’s application-layer socket emulation capabilities.
Creating new packet header types
For some Switchyard programs, it can be useful to create new packet header types. For example, say you want to implement a simplified dynamic routing protocol within an IP router. You might want to be able to create a new packet header for your routing protocol, and have those packet headers integrate well with the existing Switchyard Packet class. Similarly, say you want to implement a simplified Ethernet spanning tree protocol: being able to create a new packet header for carrying spanning tree information would be helpful.
Before discussing how to create a new packet header class that integrates well with the rest of Switchyard, it is important to note that it is not strictly required to create a new packet header class for either of the above example projects. Instead, you could use the existing RawPacketContents header, which has one attribute (data), a bytes object. To use a RawPacketContents header, you would need to handle all packing (“serialization”) and unpacking (“deserialization”) of header fields to and from the bytes object explicitly in your code. While this approach “works”, it leads to a less cohesive and encapsulated design and to code that may be a bit more difficult to debug because it is not well-integrated into Switchyard.
If you want to work with Switchyard’s packet header and packet classes, there are two main steps to take:
- First, create a new class that derives from
PacketHeaderBase. There are two required methods (to_bytes()andfrom_bytes()) that you’ll need to write, and some other things to be aware of when writing this class.- Second, some configuration to the packet header class that appears before your header in a normal packet needs to be done. This is just a matter of a couple method calls to do the configuration.
These steps are described below along with short examples and a longer (full) example follows.
Creating a new packet header class
As mentioned above, to create a new packet header class you must create a class that derives from PacketHeaderBase. There are two required methods to implement:
to_bytes()- This method returns a serialized packet header in the form of a
bytesobject. One of the easiest ways to “pack” a set of values into abytesobject is to use Python’sstructmodule (refer to the Python library documentation for details). The examples in this section usestruct. from_bytes(raw)- This method accepts a bytes object as a parameter and returns a
bytesobject. It populates attributes in the packet header by unpacking thebytesobject. The method should raise an exception if there aren’t enough bytes to fully reconstruct the packet header. Any part of thebytesobject passed as a parameter that aren’t used (i.e., there are more bytes passed in to the method than are necessary to reconstruct the header) should be returned by the method. As with theto_bytes()method, Python’sstructmodule is useful for performing the unpacking.
There is one restriction when implementing a new packet header class:
- The
__init__method should only take optional parameters. Switchyard assumes that a packet header object can be constructed which assigns attributes to reasonable default values, thus no explicit initialization parameters can be required by the constructor (__init__). Moreover, for compatibility with keyword-style attribute assignment in packet header classes, akwargsparameter should be included and passed to the base class initialization method call and this call to the base class must come last in the__init__method.
Below is an example of a new packet header called UDPPing that contains a single attribute: sequence. This packet header is designed to be included in a packet following a UDP header. Besides implementing an __init__ method (which optionally accepts an initial sequence value) and the two required methods, there are property getter and setter methods for sequence and a string conversion magic method. Note that we’ve decided to store the sequence value as a network-byte-order (big endian) unsigned 16 bit value (this is what the !H signifies for _PACKFMT: refer to the struct Python library documentation):
from switchyard.lib.userlib import *
import struct

class UDPPing(PacketHeaderBase):
    _PACKFMT = "!H"

    def __init__(self, seq=0, **kwargs):
        self._sequence = int(seq)
        PacketHeaderBase.__init__(self, **kwargs)

    def to_bytes(self):
        raw = struct.pack(self._PACKFMT, self._sequence)
        return raw

    def from_bytes(self, raw):
        packsize = struct.calcsize(self._PACKFMT)
        if len(raw) < packsize:
            raise ValueError("Not enough bytes to unpack UDPPing")
        attrs = struct.unpack(self._PACKFMT, raw[:packsize])
        self.sequence = attrs[0]
        return raw[packsize:]

    @property
    def sequence(self):
        return self._sequence

    @sequence.setter
    def sequence(self, value):
        self._sequence = int(value)

    def __str__(self):
        return "{} seq: {}".format(self.__class__.__name__, self.sequence)
Given the way the UDPPing packet header class has been defined, we can either set the sequence explicitly with the property setter, pass a value into the __init__ method, or use keyword syntax:
>>> up1 = UDPPing()
>>> print(up1)
UDPPing seq: 0
>>> up2 = UDPPing()
>>> up2.sequence = 13
>>> print(up2)
UDPPing seq: 13
>>> up3 = UDPPing(sequence=42)
>>> print(up3)
UDPPing seq: 0
If we now create a full Packet object, we might do something like the following. Note that our code both serializes and deserializes the packet. We do this to test (at least in a limited way) that our to_bytes() and from_bytes() methods work as expected. Here is the code:
UDP_PING_PORT = 12345
pkt = Ethernet(src="11:22:11:22:11:22",
               dst="22:33:22:33:22:33") + \
      IPv4(src="1.2.3.4", dst="5.6.7.8",
           protocol=IPProtocol.UDP, ttl=64) + \
      UDP(src=55555, dst=UDP_PING_PORT) + \
      UDPPing(42)
print("Before serialize/deserialize:", pkt)
xbytes = pkt.to_bytes()
reanimated_pkt = Packet(raw=xbytes)
print("After deserialization:", reanimated_pkt)
And here is the output:
Before serialize/deserialize: Ethernet 11:22:11:22:11:22->22:33:22:33:22:33 IP | IPv4 1.2.3.4->5.6.7.8 UDP | UDP 55555->12345 | UDPPing seq: 42
After deserialization: Ethernet 11:22:11:22:11:22->22:33:22:33:22:33 IP | IPv4 1.2.3.4->5.6.7.8 UDP | UDP 55555->12345 | RawPacketContents (2 bytes) b'\x00*'
Notice that the first line of output shows the full packet as we expect, including the final UDPPing header. The next line to follow, however, shows that the packet has been reconstructed with the final header as RawPacketContents, not UDPPing. What happened?
Configuring the lower-layer header class
What happened in the above example is that Switchyard does not have enough information to know that the bytes that follow the UDP header should be interpreted as the contents of a UDPPing packet. It is possible, however, to give this information to Switchyard.
Switchyard assumes that there exists one attribute in a packet header that can be used to determine how to map values of that attribute to a packet header class. Not surprisingly, these mappings are stored in the form of a Python dictionary. For example, by default the Ethernet class is configured to use the value of the ethertype attribute as a lookup key to determine the type of the packet header that follows. It contains a few initial mappings, including a mapping from EtherType.IP to IPv4. Similarly, the IPv4 class uses values in the protocol attribute as keys to look up the packet header type that should come next.
Switchyard contains methods to make it possible to change the attribute on which lookups are performed, to add new mappings from a value on the mapped attribute to a packet header class, and to completely (re)initialize the mappings from attribute values to packet header classes. Noting that one should, of course, use care when modifying any existing mappings or when modifying the attribute on which mappings are performed, here are the three class methods available on PacketHeaderBase-derived classes:
set_next_header_class_key(attr)- This method is used to specify the attribute on which lookups to determine the next header class should be performed. Switchyard-provided header classes contain sensible defaults for this value. For example, with
EthernetandVlanthis attribute is preconfigured asethertype, forIPv4this attribute is configured asprotocol, and forIPv6it isnextheader. There is no default configuration set forUDPorTCP, but the natural choice would bedst(i.e., to use the destination port as the key). Most other headers are configured with the empty string, indicating that no “next header” is assumed by Switchyard. In that case, Switchyard will construct aRawPacketHeaderobject containing the remaining bytes. add_next_header_class(attr, hdrcls)- This method is used to add a new attribute value-header class mapping to the next header mapping dictionary.
set_next_header_map(mapdict)- This method can be used to replace any previous dictionary with a new one. Switchyard-provided header classes are configured with sensible defaults. Use with care, since a replacement of a next header class mapping in a highly dependend-upon header class (e.g,
IPv4) will likely break lots of things.
Note
A key limitation of Switchyard, currently, is that arbitrary values for core protocol number enumerations (in particular, EtherType and IPProtocol) cannot be dynamically added and/or modified because Python’s enum types are constant once created. This makes it impossible, at present, to use arbitrary protocol numbers for new layer 3 or 4 protocols and packet header types. This will be changed in a future version of Switchyard. In the meantime, a workaround is to use an existing protocol number which is not used in the next header map. For example, if you are implementing a routing protocol on top of IPv4, you could use IPProtocol.OSPF as the protocol number for your (non-OSPF) protocol since Switchyard does not have any current mapping between that protocol number and a packet header class.
Building on the previous example with UDPPing, if we add two lines of code to specify that the destination port should be used as a key to look up the correct next header in a packet, and to register a particular UDP destination port as being associated with the UDPPing protocol, the final couple bytes can get properly interpreted and deserialized into the right packet header (notice the first two lines of code, which are the only differences with the previous example):
UDP.add_next_header_class(UDP_PING_PORT, UDPPing)
UDP.set_next_header_class_key('dst')
pkt = Ethernet(src="11:22:11:22:11:22",
               dst="22:33:22:33:22:33") + \
      IPv4(src="1.2.3.4", dst="5.6.7.8",
           protocol=IPProtocol.UDP, ttl=64) + \
      UDP(src=55555, dst=UDP_PING_PORT) + \
      UDPPing(sequence=13)
print("Before serialize/deserialize:", pkt)
xbytes = pkt.to_bytes()
reanimated_pkt = Packet(raw=xbytes)
print("After deserialization:", reanimated_pkt)
Here is the output, showing
Before serialize/deserialize: Ethernet 11:22:11:22:11:22->22:33:22:33:22:33 IP | IPv4 1.2.3.4->5.6.7.8 UDP | UDP 55555->12345 | UDPPing seq: 13
After deserialization: Ethernet 11:22:11:22:11:22->22:33:22:33:22:33 IP | IPv4 1.2.3.4->5.6.7.8 UDP | UDP 55555->12345 | UDPPing seq: 13
One more example
Here is one additional example. Say that we want to implement a simplified Ethernet spanning tree protocol and want to create a packet header that includes an identifier for the root note and an integer value which indicates the number of hops to the root. We could do the following:
from switchyard.lib.userlib import *
import struct

class SpanningTreeMessage(PacketHeaderBase):
    _PACKFMT = "6sxB"

    def __init__(self, root="00:00:00:00:00:00", **kwargs):
        self._root = EthAddr(root)
        self._hops_to_root = 0
        PacketHeaderBase.__init__(self, **kwargs)

    def to_bytes(self):
        raw = struct.pack(self._PACKFMT, self._root.raw, self._hops_to_root)
        return raw

    def from_bytes(self, raw):
        packsize = struct.calcsize(self._PACKFMT)
        if len(raw) < packsize:
            raise ValueError("Not enough bytes to unpack SpanningTreeMessage")
        xroot,xhops = struct.unpack(self._PACKFMT, raw[:packsize])
        self._root = EthAddr(xroot)
        self.hops_to_root = xhops
        return raw[packsize:]

    @property
    def hops_to_root(self):
        return self._hops_to_root

    @hops_to_root.setter
    def hops_to_root(self, value):
        self._hops_to_root = int(value)

    @property
    def root(self):
        return self._root

    def __str__(self):
        return "{} (root: {}, hops-to-root: {})".format(
            self.__class__.__name__, self.root, self.hops_to_root)
Here is some example code for how we might use this class. Note that since we are creating a protocol header that should follow the Ethernet header, we must (due to a current limitation with Switchyard) use an existing ethertype value. We are reusing the value EtherType.SLOW for no particular reason other than it is presently unused by Switchyard:
spm = SpanningTreeMessage("00:11:22:33:44:55", hops_to_root=1)
print(spm)

Ethernet.add_next_header_class(EtherType.SLOW, SpanningTreeMessage)
pkt = Ethernet(src="11:22:11:22:11:22",
               dst="22:33:22:33:22:33",
               ethertype=EtherType.SLOW) + spm
print(pkt)
xbytes = pkt.to_bytes()
p = Packet(raw=xbytes)
print(p)
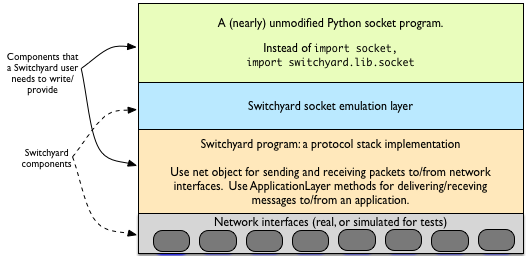
Application layer socket emulation and creating full protocol stacks
It is possible within Switchyard to implement a program that resembles a full end-host protocol stack. The protocol stack can be used along with Switchyard’s socket emulation library to execute nearly unmodified Python UDP socket programs. In this section, we discuss (1) additional API calls used to receive messages “down” from socket applications as well as deliver messages “up” to socket applications, (2) usage of and limitations with Switchyard’s socket emulation library, and (3) additional command-line options with swyard for executing a socket application along with a protocol stack program.
A general picture of using Switchyard to execute a protocol stack and a socket application is shown below. Note that the figure shows two components that are provided (or controlled) by Switchyard, and two components that must be written or provided by a user of Switchyard.
API calls for delivering/receiving messages to/from applications
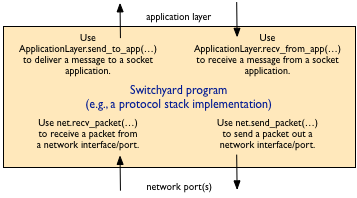
To deliver messages to or receive messages from a socket application, a Switchyard user must use two static methods on the ApplicationLayer class. These methods are similar in many ways to the two methods on the net object used to send and receive packets. The application-related methods are:
ApplicationLayer.send_to_app(proto, local_addr, remote_addr, data)This method is used to pass a message received on the network up to an application. The
protoparameter is the IP protocol number of the packet from which the data was received.local_addrandremote_addrare 2-tuples consisting of an IP address and port. This method returns a boolean value: if there is a socket associated with the address information given, True is returned. Otherwise, False is returned.Note that if there is no socket associated with the address information given, a log warning is also emitted.
ApplicationLayer.recv_from_app(timeout=None)This method is used to receive an application message to be sent on the network. It takes an optional timeout argument which indicates the number of seconds to wait until giving up and raising a
NoPacketsexception. This exception is a bit of a misnomer here, but it is used for consistency withnet.recv_packet(). IfNoneis passed as a timeout value, this method will block until a message is available.If a message is available, this method returns two items in the form of a tuple: a flow address and the data to be sent. The flow address consists of 5 items in the form of a tuple: the IP protocol value, a remote IP address and port, and the local IP address and port.
Note: if an application socket is unbound, the local IP address will be
0.0.0.0. The protocol stack implementation is responsible for using a valid IP address in any outgoing packet (specifically, it should use the address assigned to the interface out which the packet is emitted).
In sum, there are 4 API calls that must be used to move packets and data through a protocol stack implementation, as shown in the figure below.
Using a similar pattern as with a “regular” Switchyard program, it is possible to service both of the incoming data channels (i.e., either packets received from a network port, or messages received from an application), as follows:
from switchyard.lib.userlib import *

class ProtocolStack(object):
    def __init__(self, net):
        self._net = net

    def handle_app_data(self, appdata):
        # do something to handle application data here, likely
        # resulting in an eventual call to self._net.send_packet()

    def handle_network_data(self, netdata):
        # do something with network data here, likely resulting
        # in an eventual call to ApplicationLayer.send_to_app()

    def main_loop(self):
        while True:
            appdata = None
            try:
                appdata = ApplicationLayer.recv_from_app(timeout=0.1)
            except NoPackets:
                pass
            except Shutdown:
                break
            if appdata is not None:
                handle_app_data(net, intf, appdata)

            netdata = None
            try:
                netdata = net.recv_packet(timeout=0.1)
            except NoPackets:
                pass
            except Shutdown:
                break
            if netdata is not None:
                handle_network_data(netdata)


def main(net):
    stack = ProtocolStack(net)
    stack.main_loop()
    net.shutdown()
Note
Although the protocol stack example above uses a single Python thread to service both the from-network and from-application queues, it is possible to use multiple Python threads. The socket emulation library (discussed next) is threadsafe, as is the library code that handles sending/receiving packets on network ports.
Switchyard’s socket emulation library
Switchyard provides a module similar to Python’s built-in socket module that contains clones of many of the methods, functions and other items in the built-in module. We refer to the Switchyard socket module as an emulation module since it emulates the semantics of methods in the built-in module. The only line of code required to take advantage of Switchyard’s socket emulation module is the import line. Instead of using importing a module named socket, you must import a module named switchyard.lib.socket. The from ... import * idiom is generally discouraged in Python, and a way to avoid this while isolating the change in a socket application to a single line is to do the following:
# instead of:
import socket

# to use Switchyard's socket emulation module, do:
import switchyard.lib.socket as socket
When using the suggested modification above, any use of attributes within the socket module (either built-in or emulated) can just be prefixed with socket. as normal. Note that in the code below, bytes objects are sent and received using sendto and recvfrom. (This same code is available in the examples folder in the Switchyard github repo.)
#!/usr/bin/env python3

# import socket
import switchyard.lib.socket as socket

HOST = '127.0.0.1'
PORT = 10000
s = socket.socket(socket.AF_INET, socket.SOCK_DGRAM)
s.settimeout(2.0)

print("Sending message to server at {},{}".format(HOST,PORT))
s.sendto(b'Hello, stack', (HOST,PORT))
try:
    data,addr = s.recvfrom(1024)
    print('Client socket application received message from {}: {}'.format(repr(addr),data.decode('utf8')))
except:
    print("Timeout")

s.close()
There are some key limitations and other issues to be aware of with Switchyard’s socket emulation component:
- The most important limitation is that only UDP sockets are supported. Attempting to create any other type of socket will result in failure. Other socket types and support for using arbitrary protocol numbers may be supported in the future. As a result, there are a few socket object method calls that are not supported, such as
listenandaccept.- The
create_connectionandsocketpaircalls are not available.- The
getsockoptandsetsockoptcalls are not currently supported, but may be in a future version.- The various DNS-related calls in the socket module (e.g.,
gethostbyname, etc.) are available and simply handed off to the built-insocketmodule. Switchyard does not implement any DNS capability directly. Same for the byte-ordering calls (e.g.,ntohs,ntohl, etc.)- Switchyard attempts to be careful about choosing a local (ephemeral) port number for use, but its approach isn’t fool-proof. There may be problems that arise due to a host OS using a local port that was already being used by Switchyard, but these situations should be rare in occurrence.
Note
Switchyard implements the socket layer by attempting to mirror, as closely as possible, the same constants, classes, and functions in the built-in socket module. It maintains a shared (threadsafe) queue that handles all data passed down from a socket application, and creates a separate queue for each socket for handling data being passed up to an application. As a result, Switchyard can support an application using multiple sockets at the same time (as long as they’re all UDP!).
Starting socket applications with swyard
There is one additional command-line option for swyard when using a socket emulation application. The -a is used to specify the name of a file that contains the application-layer socket program.
The -a option can be used in conjunction with a Switchyard test scenario. If you want to test that a socket application emits a packet, then receives a packet from some “remote” host, you could create an expectation that a packet is emitted and an expectation that some other packet is received. You may need to use the copyfromlastout argument when creating the PacketInputEvent, since the test scenario may not actually know what local port is being used by an application (among other things).
For example, to run a particular test scenario as well as an application program, the command line might look like the following:
$ swyard -a clientapp_udpstackex.py -t udpstack_tests.py udpstack.py
Note that the Python files used in the command line above are available in the examples folder of the Switchyard github repo.
To run in live mode, simply remove the -t option. Note that there is a server program in the examples folder that can be run with this code in live mode: you can see that the Switchyard-based UDP stack and associated client-side program can interact correctly with a “regular” Python UDP-based server program.
One final limitation to be aware of: only one socket application can be started by Switchyard at a time. This limitation may change in a future version.
Finally, note that Switchyard currently does not have any capabilities for testing the behavior of an application-layer socket program. The application code could use calls to assert() to verify that certain things happen as expected within the application, but there are no specific Switchyard features to help with this.
Note
When using Switchyard to create a protocol stack and run a socket-based application on a standard commodity operating system (e.g., a desktop/laptop Linux or macOS system), you may need to be careful about configuring the host firewall settings when starting Switchyard in real/live mode. In particular, any packets that you want Switchyard to handle should be explicitly blocked from the host operating system (or the host OS may respond in addition to Switchyard responding). It may also be helpful to explicitly bind your application socket to a particular port in order to limit the number of protocols and/or ports that need to be blocked from the host OS.
Note that when Switchyard is started with the -a flag and is thus starting an application-layer socket program, its default behavior with respect to the firewall is different. Normally, Switchyard blocks the host OS from receiving any traffic, but when executing an application-layer program no traffic is blocked, by default.
Refer to the section on Firewall options for command-line options to swyard to ensure that you block the correct traffic.