|
CS 100 Spring 2014
Lab 8 |
draw() &
animation |
Due Monday April, 21st
Using the Processing language/environment answer the questions below.
Consider the following code written using functions.
void setup() {
  size(400, 400);
  noStroke();
}

void draw() {
  background(75, 172, 245);
  drawDuck(200, 150, 150, 120);
}

void drawDuck(int centerX, int centerY, int objWidth, int objHeight) {

  noStroke();
  float headSize = objHeight/2.0;

  float headX = centerX + 3/2.0 * objWidth/5.0;
  float headY = centerY - objHeight/4.0;

  float beak = 1/3.0 * headSize;
  fill(245, 148, 75);

  triangle(headX+headSize/2.0-beak/3.0, headY-beak/3.0,
           headX+headSize/2.0+beak, headY,
           headX+headSize/2.0-beak/3.0, headY+beak/3.0);


  float bellyVerticalSize = 4/3.0 * headSize;
  float bellyY = centerY + 1/3.0 * headSize;
  fill(245, 230, 75);

  ellipse(centerX, bellyY, objWidth, bellyVerticalSize);

  //println(bellyVerticalSize + " " + bellyY);

  // add code here for the head
  // grid to help you. comment out once you have it right
  drawGrid(centerX, centerY, objWidth, objHeight, headX, headY, bellyY);

}

void drawGrid(int centerX, int centerY, int objWidth, int objHeight,
                                   float headX, float headY, float bellyY) {
  stroke(0);
  strokeWeight(2);
  noFill();

  float boundaryBoxX = centerX-objWidth/2.0;
  float boundaryBoxY = centerY-objHeight/2.0;
  rect(boundaryBoxX, boundaryBoxY, objWidth, objHeight);

  strokeWeight(6);
  stroke(255, 0, 0);
  point(headX, headY);
  point(centerX, bellyY);

  strokeWeight(1);
  fill(0);
  float incY = 1/4.0 * objHeight;
  float lineY =  boundaryBoxY + incY;
  while (lineY < boundaryBoxY+objHeight) {
    line(boundaryBoxX, lineY, boundaryBoxX+objWidth, lineY);
    lineY =  lineY + incY;
  }

  float incX = 1/5.0 * objWidth;
  float lineX =  boundaryBoxX + incX;
  while (lineX < boundaryBoxX+objWidth) {
    line(lineX, boundaryBoxY, lineX, boundaryBoxY+objHeight);
    lineX =  lineX + incX;
  }
}
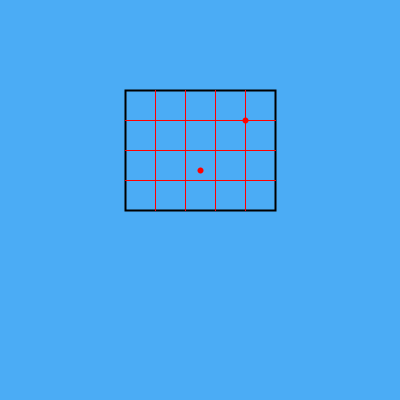
Before running the program
- read carefully
- consider the grid in the image below, which is drawn when
drawDuck( .. )callsdrawGrid( .. ) - draw on the grid the shapes created by the graphics calls in
drawDuck( .. ).
Copy and paste the code above into a file duckScene.pde.
Run the program and compare the result to your prediction.
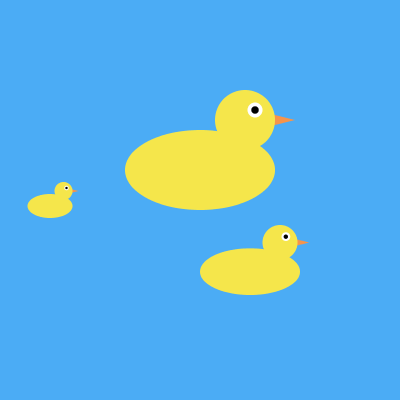
1. [3 pts] Add graphics function calls inside the drawDuck(...)
to complete the head of the one duck the function draws. See the larger duck
model in the image below.
- The head is centered on the red dot at the top right on the grid shown above.
- The duck profile includes an eye.
2. [4 pts] Add to the body of draw() to make it draw
the following image.
- There are at least three ducks.
- They are different sizes.
- They are at different locations on the water.
- They are not vertically aligned.
3. [3 pts] Save your previous program with the following new name
duckSceneAnimate.pde.
Modify this program to have the ducks moving to the right.
Hints:
- It is similar to the clouds example we did in class last week.
- The Processing reference for
draw()may be useful: run and explore the first code example.
Bonuses
- Modify/add to the
drawDuck(...)function to create better looking ducks.
- Make the ducks reappear on the left after they all have disappeared on the right.
Check this demo- wait a bit and
- once the ducks appear feel free to explore with the keyboard and the mouse for more interactions...
- Make the ducks follow a curvy path (sin/cos function) instead of going on a straight line.
- **Megabonus** Simulate murky coloured feet paddeling beneath the surface!